- On the iPad, launch Safari and then type 'http://casper'
- You will be prompted for your Username and Password. Your username is your Student ID/Cases Code for example 'ABC0007'. Your default password is your 8 Digit Date of Birth Date in the formate DDMMYYYY. For example 01/01/2021 will be 01012021. Once you've inputted the details, please select 'Log In'
- Select 'Continue' for the CA certificate
- Select 'Allow'
- Select 'Close' and then go to Settings, which should be located on your home screen of the iPad
- At the top left hand corner, there will be a 'Profile Downloaded' pop up, above the Aeroplane Mode. Click it.
- On the right, there will be 'CA Certificate'. Select it and click 'Install'
- On the next screen, select 'Install'
- On the next screen, select 'Done'
- Go back to Safari and it should look like the following image. Select 'Continue'
- Select 'Allow'
- Select 'Close'
- Go back to Settings, select 'Profile Downloaded' if you're not on that screen and then select 'MDM Profile' under 'Downloaded Profile'
- Select 'Install'
- Select 'Install'
- Select 'Install'
- Select 'Trust'
- Go back to Safari and if the installation is successful, this screen should display:
- Allow time for the 'App Installation' to pop up and select Install when you do:
- Self Service should begin installing on one of the home pages of your iPad
.png)
.png)
.png)
.png)
.png)
.png)
.png)
.png)
.png)
.png)
.png)
.png)
.png)
.png)
.png)
.png)
.png)
.png)
.png)
- On the iPad, launch Safari and then type 'https://jss.hgc.vic.edu.au:8443/enroll'
- You will be prompted for your Username and Password. Your username is your Student ID/Cases Code for example 'ABC0007'. Your default password is your 8 Digit Date of Birth Date in the formate DDMMYYYY. For example 01/01/2021 will be 01012021. Once you've inputted the details, please select 'Log In'
- Select 'Continue' for the CA certificate
- Select 'Allow'
- Select 'Close' and then go to Settings, which should be located on your home screen of the iPad
- At the top left hand corner, there will be a 'Profile Downloaded' pop up, above the Aeroplane Mode. Click it.
- On the right, there will be 'CA Certificate'. Select it and click 'Install'
- On the next screen, select 'Install'
- On the next screen, select 'Done'
- Go back to Safari and it should look like the following image. Select 'Continue'
- Select 'Allow'
- Select 'Close'
- Go back to Settings, select 'Profile Downloaded' if you're not on that screen and then select 'MDM Profile' under 'Downloaded Profile'
- Select 'Install'
- Select 'Install'
- Select 'Install'
- Select 'Trust'
- Go back to Safari and if the installation is successful, this screen should display:
- Allow time for the 'App Installation' to pop up and select Install when you do:
- Self Service should begin installing on one of the home pages of your iPad
- Turn on the TV to see the Wireless Display you are connecting to. If nothing appears, make sure you have selected the correct HDMI input on the TV via the remote.
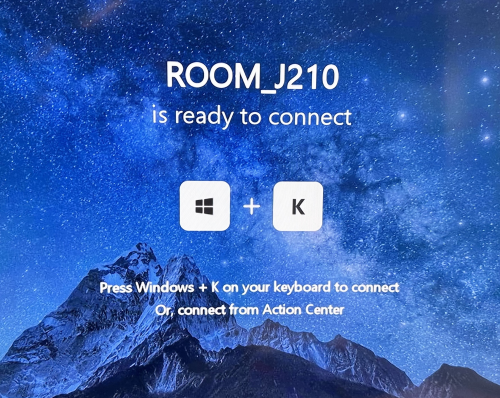
- On your computers keyboard, press Windows logo key + K to open casting menu on your computer
- Select the Display Adapter that matches the TV name
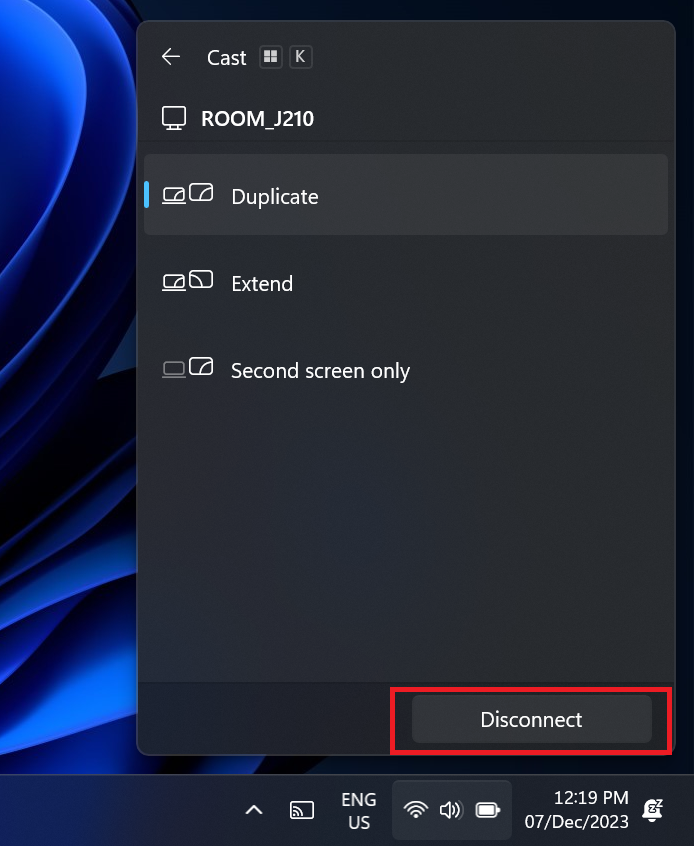
- To Disconnect, go to the bottom right corner of your screen, where the time and date are displayed and click on the casting icon that appears after you have connected to your display in previous steps
- The casting menu will appear then select disconnect


If you encounter issues connecting to the TV, try restarting your computer. If the problem persists, please contact IT support for further assistance
- Go to the menu bar at the top left hand corner
- Select air play
- Select the Apple TV you are using
- Input the code that pops up on the TV from the Apple TV
- To disconnect, you need to go back to step 1-2 and disconnect
- Turn on the TV and ensure you are on the correct HDMI input that should display Apple TV information.
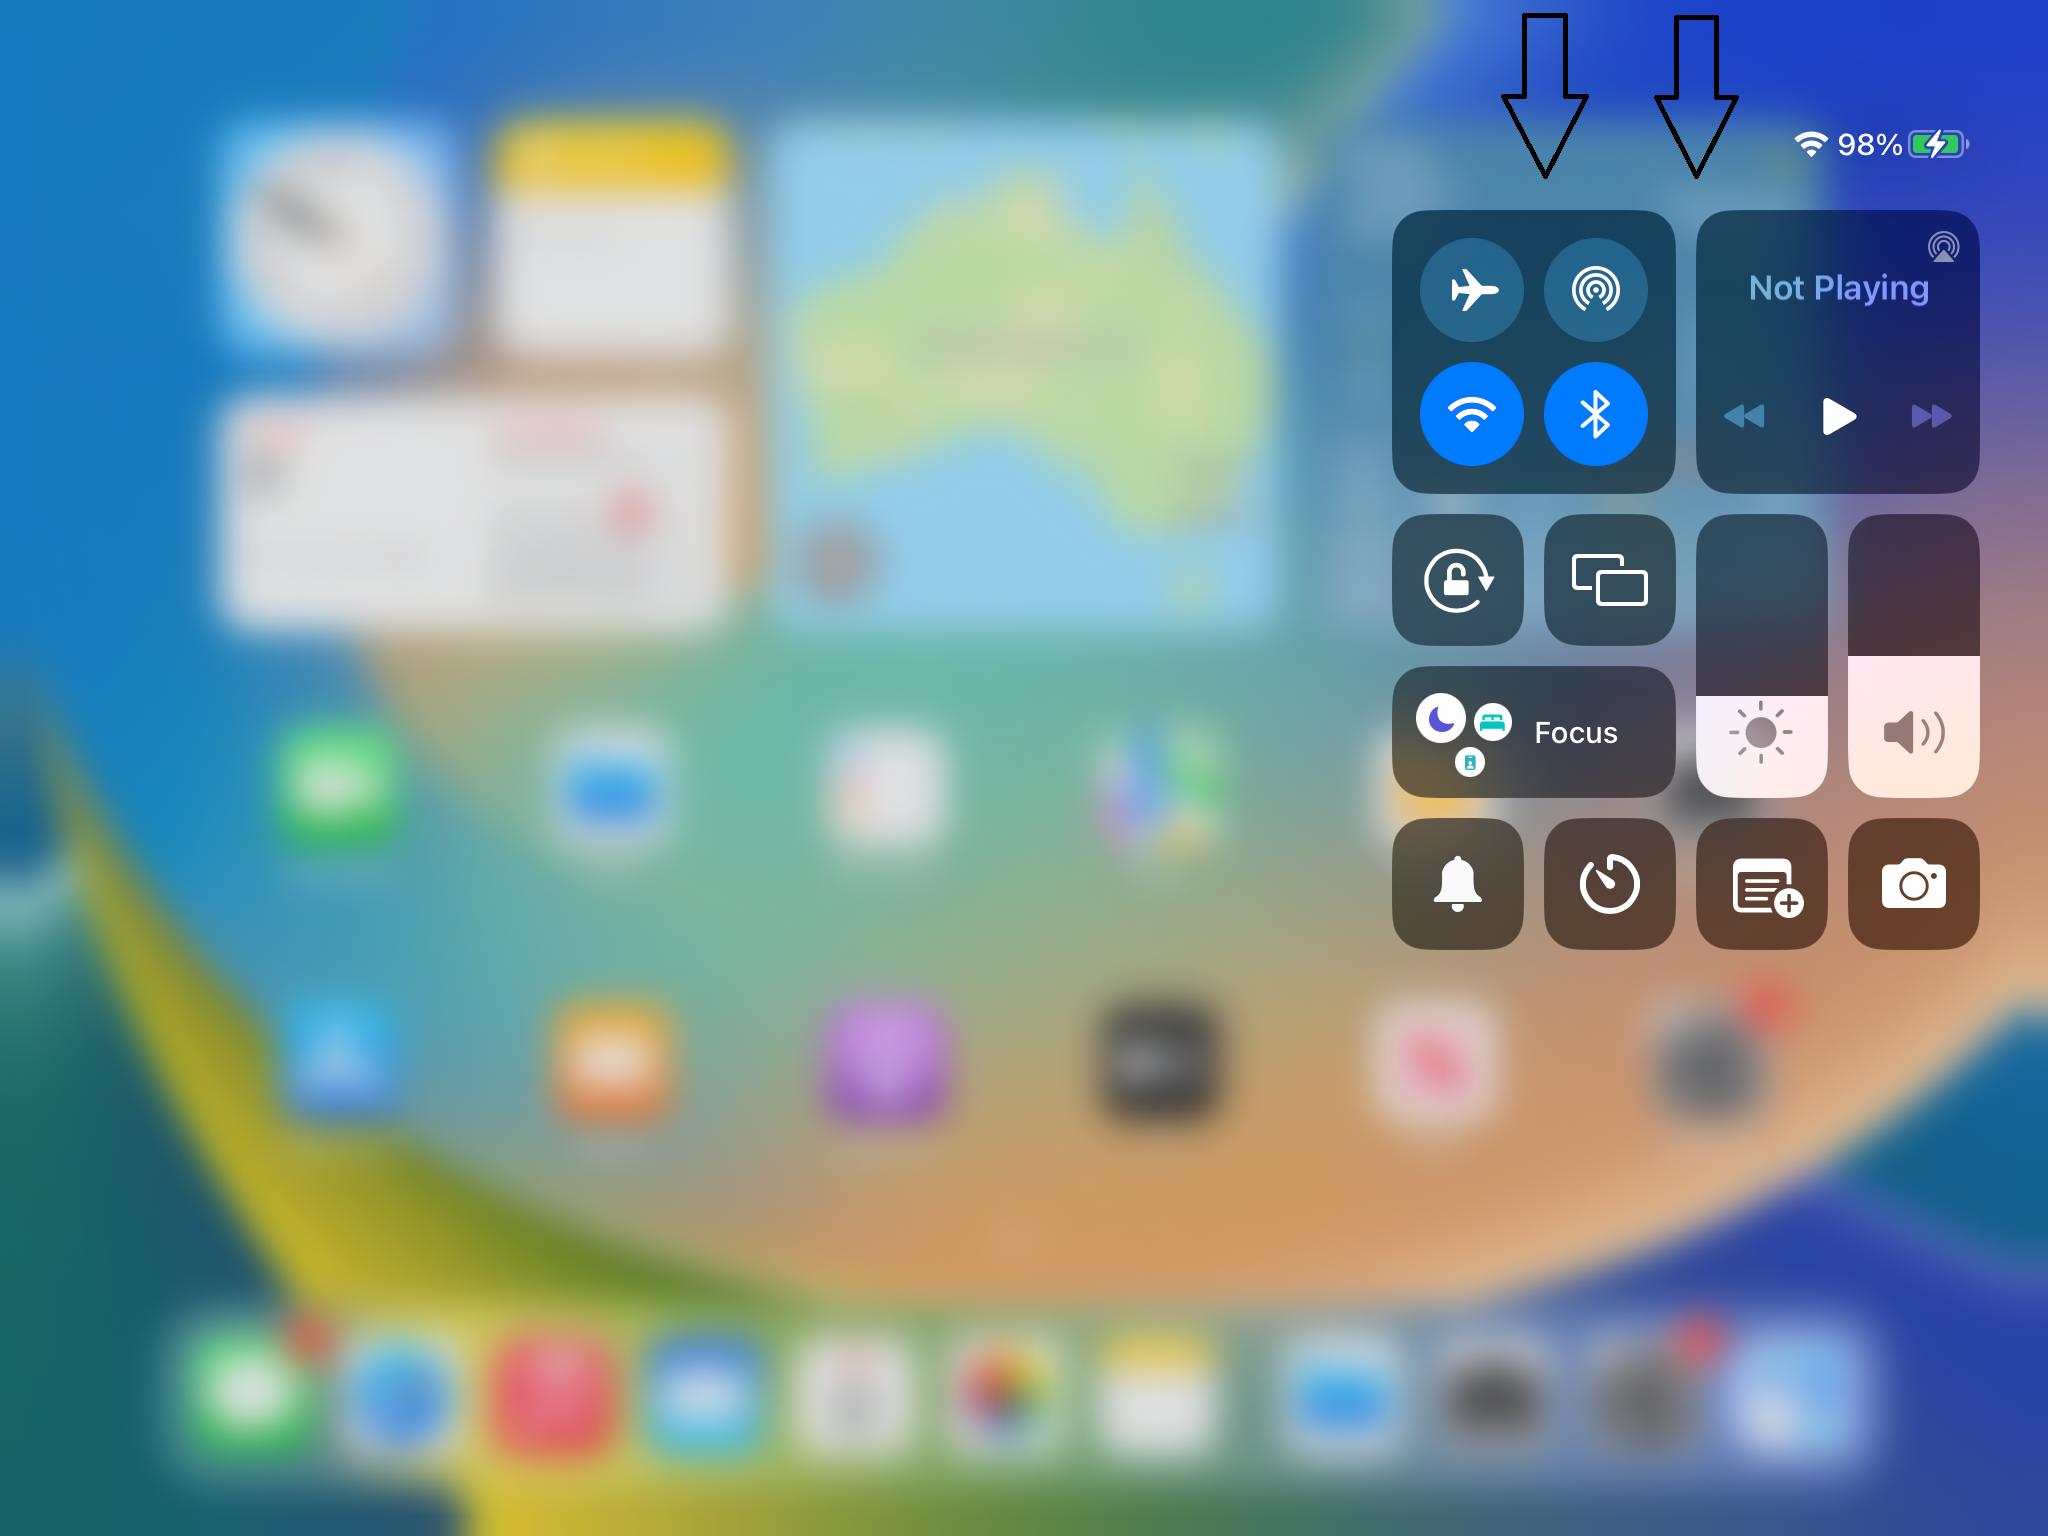
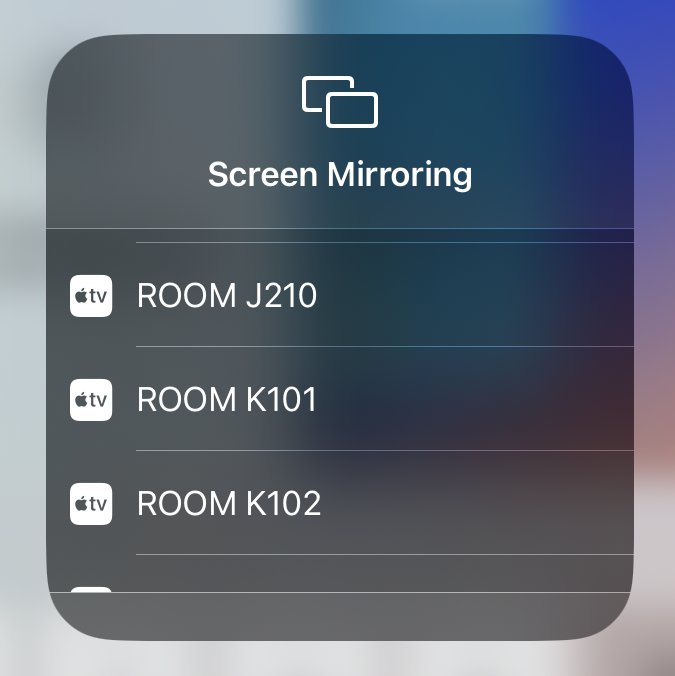
- Swipe down top right corner of iPad to view the control centre
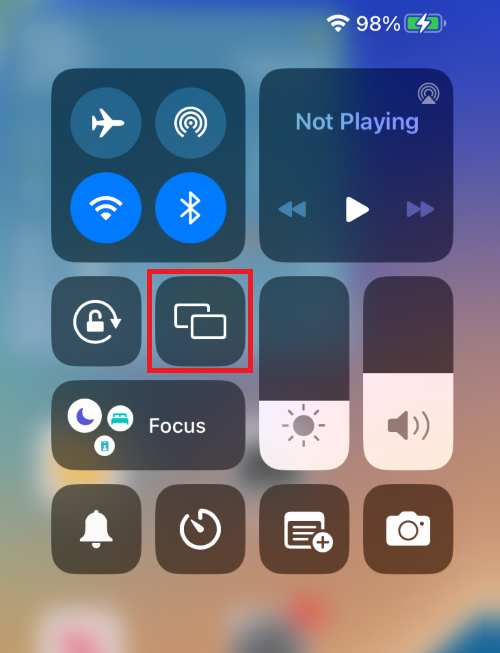
- Select Screen Mirroring
- Select the Apple TV you are using, you may need to swipe through to find you're TV
- Input the code that appears on the TV from the Apple TV
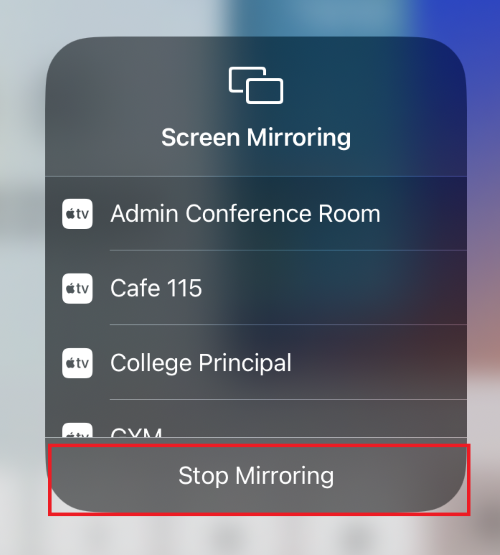
- To disconnect, you need to go back to step 1-2 and disconnect
Some parental control settings may restrict students from making changes or viewing certain websites on their iPad. While this can be a valuable feature for ensuring app safety and screen time management, it's important to be aware that it can limit our ability to troubleshoot certain issues at school. Please click below links for steps on how to modify or disable these settings ..
In some cases, we may need to temporarily remove and reinstall apps to diagnose and resolve technical issues. Restricting app removal can hinder our ability to perform these necessary troubleshooting steps. Allowing temporary flexibility in app removal during school hours can help us efficiently address technical challenges without compromising the students overall safety.
- Open the 'Settings' app on students iPad.
- Tap on 'Screen Time.
- Enter your Screen Time passcode if prompted.
- Select 'Content & Privacy Restrictions.' If it's turned off, enable it by toggling the switch
- Tap on 'iTunes & App Store Purchases.'
- Choose 'Deleting Apps' and tap 'Allow.'
Locking WiFi settings can prevent students from making changes to network configurations, but it's essential to understand its impact on troubleshooting. In the event of connectivity problems, accessing WiFi settings can be crucial for diagnosing and resolving network-related issues. Locking WiFi settings can limit our ability to perform these tasks promptly.
- Go to the 'Settings' app.
- Select 'Screen Time.'
- Enter your Screen Time passcode.
- Choose 'Content & Privacy Restrictions' and ensure it's turned on.
- Scroll down and tap on 'Allowed Apps.'
- Ensure the switch next to 'Wi-Fi' is turned on, allowing changes to be made.
If there are restrictions setup to prevent students from accessing certain websites, you may need to adjust the settings to add sites such as "http://casper" when there are times that we may need to re-enroll a device when troublshooting. Below are the steps to make these adjustments:
- Go to the 'Settings' app.
- Select 'Screen Time.'
- Enter your Screen Time passcode.
- Select 'Content & Privacy Restrictions.' If it's disabled, enable it.
- Tap on 'Content Restrictions.'
- Scroll down to 'Web Content' and tap on it.
- Choose 'Unrestricted Access' to allow all websites, or select 'Limit Adult Websites' and manually enter the specific school URLs required under 'ALLOWED Websites.'
To enhance student learning experience with classroom apps such as Seesaw, Google suite, and others. It is important to ensure that these apps have access to the iPad's camera and microphone as students will not be able to use them within the app if the camera nd microhpne is disabled for the app.
- Open the 'Settings' app on students iPad.
- Scroll down and select the app you want to enable camera access for (e.g., Seesaw, Google Classroom).
- Tap on the app to open its settings.
- Find the 'Camera' and 'Microphone' option and toggle the switch to 'On' (green) for both if required.